

Animating a gradient sweeping across the surface is a very quick and efficient way to create a transition from one material to another.
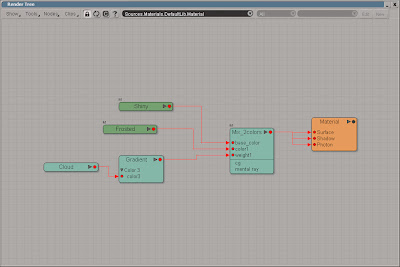
This is a very common question. Okay perhaps not the frosted effect, but the part about changing the textures or materials for an object over time. You obviously need a surface for the material so start a new scene and create a simple object. Or just open the scene frost.scn from this issues DVD. Select the frost object and from the Get > Material menu choose Phong and Press [7] to open a Render Tree. Get a Gradient node from the Nodes > Texture menu and a Mix 2 Colors node from the Nodes > Mixers menu. Connect the gradient node to the Weight input of the Mix_2colors node and the Mix_2colors node to the surface input of the Material node. Double click on the gradient node to open the PPG and switch to the Texture tab. Click the New button and from the menu choose Planar XY. Switch back to the RGBA Gradient tab and click the White/Black button in the Preset section to set the gradient to white and black. While this will create a nice gradual transition, it’s to uniform and unexciting. To break up the gradient you’ll need to add a new marker. Click somewhere in the middle of the gradient slider to add a third marker. With the new marker selected, click on the connection icon for the color and from the menu choose Cloud. Switch to the Texture tab, click the New button and choose Spatial. Switch back to the Cloud tab. Set the Clouds color to a light gray, such as R: 0.8, G: 0.8, B0.8 and the Sky to a slightly darker gray, R: 0.58, G: 0.58, B0.58. Switch to the Advanced tab and change the X,Y and Z maximum to 10.
From the Nodes > Illumination menu, add two Pong shaders and connect one to the base_color input of the Mix_2colors node and the other to the color1 input. Modify the Phong shaders to your liking and close the Render Tree. In a viewport, select the planar Texture_Support and scale it to about 0.4 on the Y-axis. Position it just below the frost object and press [K] to set a keyframe. Go to frame 50 and move the Texture_Support so it’s just above the object and set a new keyframe. Render the animation and you’re done.
 Once the gradient is in place, you can replace the solid colors with textures to create complicated pattern.
The project files used in this tutorial can be found at: http://www.redi-vivus.com/Caffeineabuse/Frost.zip
Quick tip
You can create a completely different look for the transition just by replacing the cloud texture with any of the other textures nodes.
You can create a completely different look for the transition just by replacing the cloud texture with any of the other textures nodes.


0 comments:
Post a Comment