Your online Softimage Educational Resource

The blog has been online for more than 4 years and there’s still not a single post even remotely related to the delicious brew called coffee… Perhaps it will someday, but in the meantime you can read the articles about Softimage. Most of the material are tutorials and Q&As I’ve written for 3D World Magazine sometime between today and 2003. If you have any questions please don’t hesitate sending me an email.


Thanks to Letterbox Animation Studios for hosting all the scene files.

Make sure you visit their Redi-Vivus.com for 100s of hours of free XSI video tutorials.

Wednesday, December 23, 2009

Problem Downloading project files

There seems to be a slight problem downloading the project files for the tutorials. Please let me know if you experience this and I’ll send you the files via email…


Read the full post>>

Merry Christmas and Happy New Year!

Just wanted to wish you all a merry Christmas and a happy New Year! While I haven’t much time lately to add more articles there are some goodies waiting to be published, so stay tuned…


Read the full post>>

Thursday, December 3, 2009

Animating a cable using Softimage cloth


The project files used in this tutorial can be found at:
http://www.redi-vivus.com/Caffeineabuse/Cable_Using_SoftimageCloth.zip


Softimage Cloth
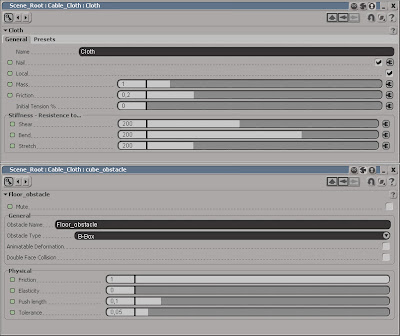
Start by open the scene cabel.scn from this issues CD. Select the Cable_Cloth object and press [T] to set the selection filter to points and select the two vertices at the right end of the object. From the Edit menu choose Create Cluster with Center. Press [4] to switch to the Simulate Toolbar. Select the Cable_Cloth object and from the Create > Cloth menu choose From Selection. Different types of cables obviously has different characteristics. Use the values in the above screenshot as a starting point and experiment on your own.

Local Cloth Cluster
Now, select the two vertices again and from the Create > Cloth menu choose Local Cloth Cluster. Make sure you check the Nail checkbox in the Cloth PPG. Select the object again and from the Get > Force menu choose Gravity. Select the Cable_Cloth again and from the Modify > Environment menu choose Set Obstacle. When prompted, pick the Floor object. Right click to end the picking session. In the Floor_obstacle PPG increase the friction to 0.8 or so to stop the cable from sliding all over the place. Set the Push length to 0.1 to compensate for the cable’s thickness.

Extract from edge
Select all the edge along one side of the cloth object. Press [1] to switch back to the Model toolbar and from the Create > Curve menu choose Extract from Edges. This creates a separate curve object from the selected edges and because it’s a live operator the cloth simulation will automatically be propagated as well. Name the curve Cable_Path. From the Primitive > Curve get a Circle and set the Radius to 0.05. From the Create > Poly.Mesh menu choose Extrusion Along Curve and pick the Cable_Path curve when prompted. Animate the Null object and your cable will follow perfectly.


Read the full post>>