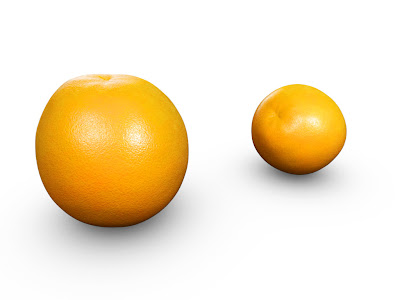
 There’s a vast variety of oranges and citrus fruits, each with their distinguished color, shape and texture. But they can all be created using the same basic set of nodes.
Open the scene orange.scn, select the Orange and press [7] to open a Render Tree. From the Nodes > Texture menu get a Cell Scalar node and open its PPG. Many of the changes made to the nodes are subtle and may be hard to see solely relying on the shaderball. To get a better view of how the values affect the output you can temporary connect the current node directly to the Surface input of material node and draw a render region in the viewport. Change the Fill Color to 0 (zero) and the Border color to 0.8 to create the first set of dark dimples. Increase the Minimum Contrast to 0.35 and the Maximum to 0.65 to give it a more circular shape and lower the Bias to 0.1 Switch to the Texture Support tab. Change the Pre-Scale to Small Noise and set the Scale to 1.5
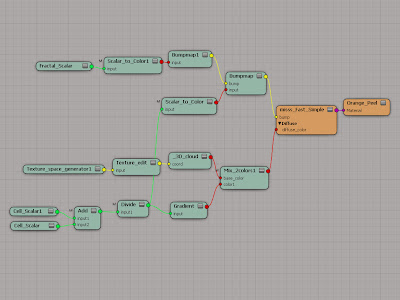
Get a new Cell Scalar node and set the Fill color to 0 and the Border color to 0.8. Change the Min to 0.3, the Max to 0.8 and the Bias to 0.1. Switch to the Texture Support tab. Set the Pre-Scaling to Small Noise and the Scale to 0.75. From the Nodes > Math menu, get a Scalar Basic node (leave the default math Operation at Add) and connect the first Cell_Scalar node to input1 and the second to input2. Get another Scalar Basic node and connect the first scalar math node to input1 and open the PPG. Set the Input 2 value to 2 and change the Operation to Divide. By first adding the two cell’s value and then dividing them you’ve effectively calculated the average of the two.
From the Nodes > Mixers menu get a Gradient node. Connect the output of the Divide node to input of the Gradient node and open the PPG. Click the Black/White Preset button to remove all but two markers. Change the color of black marker to a medium orange color, such as R:0.07, G:0.47, B:0.85. Set the color of the white marker to a slightly brighter more vivid orange, R:1, G:0.6, B:0.
Get a Cloud node (Nodes > Texture Generators) and a Texture Space Generators node (Nodes > Texture Space Generators). Open the Texture Space Generator PPG and select the Spatial projection. Close the PPG and connect it to the coord input of the 3D_Cloud and open the Cloud PPG. Increase the Level Decay to 0.85 and the Frequency Multiplier to 3. Set the Color 1 to a vivid orange R:0.9, G:0.61, B:0 and Color 2 to a somewhat darker R:0.92, G:0.45, B:0.1. Get a Mix 2 Colors node (Nodes > Mixers), open the PPG and set the Weight to RGBA: 0.35. Connect the 3D_cloud to the base_color input and the Gradient to the color1 input.
Connect the Mix_2colors node to the Ambient and Diffuse input of the Blinn node.
Get a Fractal Scalar node (Nodes > Texture) and open the PPG and set the Contrast Clamp Minimum to 0 and the Maximum to 1. Switch to the Noise tab and increase the Recursion Level to 5. Set the Scaledown to 3.3 and the Gain/Smooth to 1.5 and close the PPG. Get a Bumpmap node (Nodes > Bump) and connect the Fractal_Scalar node to its input. Open the PPG and set the Bump Scale to 0.05 and the Sample Spacing to 0.005. Get another Bumpmap node and set the Scale to 0.025 and the Sample Spacing to 0.015. Connect the Divide node to the input of connect the previous bumpmap node to its bump input. Connect the Bumpmap node to the Bump Map input of the Material node.
The project files used in this tutorial can be found at:http://dl.dropbox.com/u/3834689/CaffeineAbuse/OrangeSkin.zip
 Quick tip
While you have the dimples in place you do need a touch of sub surface scattering to sell your orange. Get a Fast Sub-Surface Scattering node (in the Illumination category) and connect the Gradient node to the Diffuce_Color input. Connect the SSS node to the Material input of the Material node.
Get a new Cell Scalar node and set the Fill color to 0 and the Border color to 0.8. Change the Min to 0.3, the Max to 0.8 and the Bias to 0.1. Switch to the Texture Support tab. Set the Pre-Scaling to Small Noise and the Scale to 0.75. From the Nodes > Math menu, get a Scalar Basic node (leave the default math Operation at Add) and connect the first Cell_Scalar node to input1 and the second to input2. Get another Scalar Basic node and connect the first scalar math node to input1 and open the PPG. Set the Input 2 value to 2 and change the Operation to Divide. By first adding the two cell’s value and then dividing them you’ve effectively calculated the average of the two.
From the Nodes > Mixers menu get a Gradient node. Connect the output of the Divide node to input of the Gradient node and open the PPG. Click the Black/White Preset button to remove all but two markers. Change the color of black marker to a medium orange color, such as R:0.07, G:0.47, B:0.85. Set the color of the white marker to a slightly brighter more vivid orange, R:1, G:0.6, B:0.
Get a Cloud node (Nodes > Texture Generators) and a Texture Space Generators node (Nodes > Texture Space Generators). Open the Texture Space Generator PPG and select the Spatial projection. Close the PPG and connect it to the coord input of the 3D_Cloud and open the Cloud PPG. Increase the Level Decay to 0.85 and the Frequency Multiplier to 3. Set the Color 1 to a vivid orange R:0.9, G:0.61, B:0 and Color 2 to a somewhat darker R:0.92, G:0.45, B:0.1. Get a Mix 2 Colors node (Nodes > Mixers), open the PPG and set the Weight to RGBA: 0.35. Connect the 3D_cloud to the base_color input and the Gradient to the color1 input.
Connect the Mix_2colors node to the Ambient and Diffuse input of the Blinn node.
Get a Fractal Scalar node (Nodes > Texture) and open the PPG and set the Contrast Clamp Minimum to 0 and the Maximum to 1. Switch to the Noise tab and increase the Recursion Level to 5. Set the Scaledown to 3.3 and the Gain/Smooth to 1.5 and close the PPG. Get a Bumpmap node (Nodes > Bump) and connect the Fractal_Scalar node to its input. Open the PPG and set the Bump Scale to 0.05 and the Sample Spacing to 0.005. Get another Bumpmap node and set the Scale to 0.025 and the Sample Spacing to 0.015. Connect the Divide node to the input of connect the previous bumpmap node to its bump input. Connect the Bumpmap node to the Bump Map input of the Material node.
The project files used in this tutorial can be found at:http://dl.dropbox.com/u/3834689/CaffeineAbuse/OrangeSkin.zip
 Quick tip
While you have the dimples in place you do need a touch of sub surface scattering to sell your orange. Get a Fast Sub-Surface Scattering node (in the Illumination category) and connect the Gradient node to the Diffuce_Color input. Connect the SSS node to the Material input of the Material node.
Read the full post>>


