 While images for prominent 3d magazines may require a resolution of 300dpi, posters and billboards requires far less.
While the images for a typical brochure often are printed at a resolution of between 150 and 300 dots per inch (dpi) posters rarely exceeds 100dpi. Once you reach the size of billboards you’ll probably end up at a resolution less than 30dpi. With the above in mind you should have limit the need for extreme high resolution rendering, but there are situations when you do want the extra pixels. The central problem with large images is the amount of RAM needed. Not only do you need to cover the frame buffer/image itself which can easily grow to several hundred mega bytes (this is without considering the recourses need to actual compute the rendering) you also need to have this amount of free continuous memory.
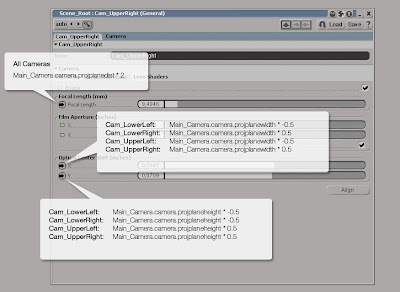
The idea is to split the rendered image into smaller images and then stitch them back together in Photoshop or XSI Illusion (FX Tree) for that matter. This is done by changing the focal length of the camera and then shifting its optical center to the left, right, up and down. This won’t change the perspective in the image, just just which part and how much you see of it. To maintain the overall control of your shots, you’ll use one camera for the staging and four additional cameras for the render. Any changes made to the main camera will then automatically get propagated to the extra cameras by the use of expression, but with the added offset.
Open the scene SuperSize.scn from this issues CD. Press [8] to open an Explorer, expand the Cam_UpperLeft_Root node and click on the icon next to the Cam_UpperLeft to open its PPG. Switch to the Projection Plane tab and check the Enable checkbox. Right click on the animation icon (green dot) next to the Focal Length and choose Expression Editor. Enter Main_Camera.camera.projplanedist * 2 and click the Apply button. This will link the Focal Length to the main camera and double it (since you are to split the size of the rendered images in half). Open the Expression Editor for the Optical Center Shift X axis and enter Main_Camera.camera.projplanewidth * -0.5 This will offset the optical center by half the main cameras film aperture. Enter the expression Main_Camera.camera.projplaneheight * 0.5 for the Y Axis. Repeat the same procedure for the other three cameras. For the Cam_UpperRight use Main_Camera.camera.projplanewidth * 0.5 for the X shift, Cam_LowerLeft should use * -0.5 for both the X and Y shift (projplanewith and projplaneheight) and the Cam_LowerRight should use *-0.5 for the Y shift.
 By using expressions the properties, and their added offset, is automatically propagated from the main camera to the extra cameras.
Quick tipThe very same approach can successfully be used to create screen captures that is larger than your display resolution as well.


4 comments:
Mr Madsen, thanks for your work, its very useful to me.
It seems that Letterbox isn't delivering the support files for this tutorial anymore. Can you help me?
I sure can. You can download the file from here: https://www.dropbox.com/s/qj37guhrl5k7qr3/XXL_Rendering.zip
*note, I’ve also added the link to the article in case someone else having problems with the old link.
Thanks a lot for your work, Mr Madsen.
Post a Comment