 Adding AO globally
While you commonly would setup and render the ambient occlusion in a separate pass, it doesn’t mean it can’t be done in a single pass as well. By adding the AO to the camera rather than the individual materials, you can control the effect globally and you don’t have to change a single material. Open the scene cube.scn from this issues DVD. Press [8] to open an Explorer, select the Camera and press [7] to open a Render Tree.
 Using a lens shader
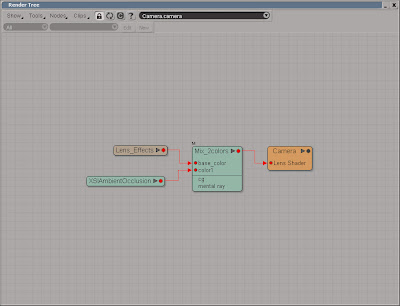
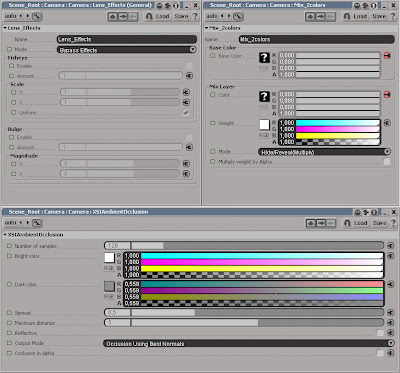
Connecting the AO directly to the camera wouldn’t make much sense at all, but you’ll need a few other nodes as well to make it work. First you’ll need a lens shader. You’re not going to use any of its features, so any lens shader will do. From the Nodes > Illumination menu choose More. Go to the DSPresets\Shaders\Lens folder, select the Lens Effect and click Ok. Open the Lens Effect PPG and change the Mode to Bypass Effects.
 The ambient occlusion
Add a Mix 2 Colors node (from the Nodes > Mixers menu) and an Ambient Occlusion (from the Nodes > Illumination menu). Connect the Lens_Effect to the base_color input on the Mix2color node and the AO node to the color1. Then connect Mix2color node to the Lens Shader input on the Camera node. Open the Mix2color PPG, set the Weight to pure white, R:1, G:1, B:1 and change the Mode to Hide/Reveal(Multiply).
The project files used in this tutorial can be found at: http://dl.dropbox.com/u/3834689/CaffeineAbuse/AmbientOcclusion.zip


6 comments:
This is certainly an interesting approach. Ideally the AO should appear in ambient areas only. That would be cool to derive the effect in such manner instead of per object basis.
Anyway I see often AO pass contributing as a general fine detail layer. Along with different intensities and merging modes applied, so this is certainly useful method. Thanks!
hey, thanks for this awesome trick.
but i have a question. When I set it to hide/reveal(multiply)it appears grayish. How come we have to change the default mix mode? Also, why do we change the lens effects to bypass mode?
thanks for the help.
awesome tutorial!
Hi czarekkwasny,
You’re absolutely right about the erroneous approach in the tutorial. As the name suggest, the ambient occlusion should ONLY be applied to the ambient part of the image. The article merely demonstrates an alternative approach to applying AO on the scene level rather than rendering separate passes and compose them in post - which is the typical/preferred way of doing it.
The correct way of using AO (though there is no such thing in reality as ambient occlusion in reality) requires a different approach, which I may write a tutorial about if people asks for it.
Cheers
Ola
Hi Eduardo,
Nice to hear you find the information useful.
The reason we apply the lens effect in the first place is purely to have the option to apply the Ambient Occlusion node to the camera. So there is no reason to compute the Toon ink lens effect, which is why you bypass the shader.
The reason you set the Mix Mode to Multiply is to darken the image based on the AO; areas occluded by the AO should get darker whereas non occluded areas shouldn’t. The reason your image looks all gray is because the cubes in the scene has the default material applied to them whereas the cubes in the “main image” in the tutorial have a “custom material”.
Cheers
Ola
hey Ola, i found extremely useful your tutorial, but my render started to get greyish too and I suspect why.
I think the Lens shaders, at least the Lens Effects, don't work well with linear workflow - if I disable the Color Management at the Preferences, it works fine again..
loved this approach to put AO on lenses, hope to overcome this issue..
big thanks
Sorry for taking a few getting back to you but (as usual) I haven’t been able to spend much time on the blog. The article was written well before Softimage included color management, hence there’s no information about it.
The reason the image is greyish is probably because the material on the cubes are grey and not white (if your refereeing the scene included in the project). The idea of the article was to show a quick way of adding ambient occlusion to the image without having to render separate passes. And if you’re not going to do any compositing (or heavy manipulation) on the rendered images there’s usually no point in utilizing a linear workflow, and definitely not if you render the image in a 8 bit image format. Though the technique as such works regardless of whether you are using a linear workflow or not.
Please note that the approach is technically wrong as it adds AO to everything and not just the ambient parts (though it is still quite useful in many situations).
Post a Comment