 After successful thesis such as cogito ergo sum ("I think, therefore I am"), the prominent French 17th century philosopher and scientist René Descartes came to the conclusion that the mind and body where separated from one and other. 400 years later we know that nothing could be more wrong. In fact, you can’t have a single thought without a bodily reaction. The second you have one, the brain cells starts working frenetic and sends signals all over the place including to the autonomous nervous system. The ANS generally performs without us being aware of it and controls functions such as the hart and respirators rate, perspiration, sexual arousal (okay, this you might be aware of) and the diameters of the pupils. So even without utter a single word your body may very well be screaming.
Only 10-15 percent of the communication between persons are based on what they are actual saying, the remaining 85 percent is communicated nonverbal. This includes everything from the body language, emotional state, and the tone of your voice to the size of your pupils. Your subconscious constantly process and analyses all of this information and when this contradict the words you’re saying, people will immediately detect there’s something wrong.
One of the more perceptible ways of nonverbal communications is the use of facial expressions. The complex anatomy of the human face enables us to pull thousands of different expressions, each with its own meaning. Fortunately, you don’t have to recreate every single one of them to bring your characters to life. There are seven different groups of emotions or expressions that are universal, meaning we express them in the same way regardless of where we live on the planet or our cultural preferences. These fundamental emotions are: joy, sadness, surprise, fear, anger, disgust and contempt. All of these, as well as the ability to interpret them, are inherited by birth and isn’t something you learn as you go trough life. Your digital character is different story though.
Whether you need countless individual sliders controlling every aspect of the face, or if you can make do with a series of predefined shapes really depends on the complexity your animation. Facial rigging can easily become over-ambitious and there’s even a good chance you start to lose control as the number of shapes and sliders simply grows out of hand. With the use of some intuitive controls you’ll probably need far less than you originally thought.
The project files used in this tutorial can be found at: http://www.Redi-Vivus.com/Caffeineabuse/FaceRig.zip
STAGE ONE Get in shape
 Step 01
Start by opening scene Face_Start.scn from this issues CD. The scene (unsurprisingly) contains an enveloped head, a skeleton and a pair of eyes. All you need for an exciting 24 step walkthrough basically. The first step is to create all the individual shapes for your character. Well, that’s not entirely true. You’ll only create the expressions on one half of the face and then mirror the shapes to create the shapes for the other half. So it’s half the work but twice the fun.
 Step 02
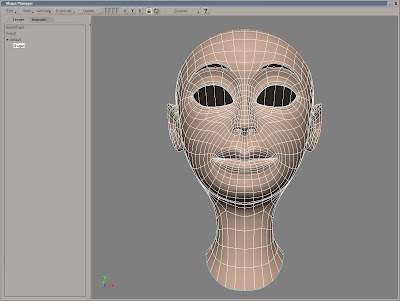
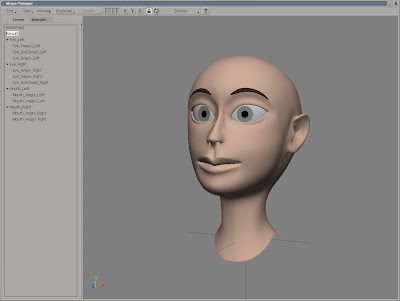
Select the head and from the View > Animations menu choose Shape Manager. For the purpose of demonstration you’ll divide the face in two sections, the eyes and the area surrounding it and the mouth. This probably isn’t something you want to do in a more advanced facial rig since you want to attain as much flexibility as possible, thus splitting it further with separate control for each part of the face (lips, nose, cheek, eyebrow etc ). However, in this scenario it will do more than fine.
 Step 03
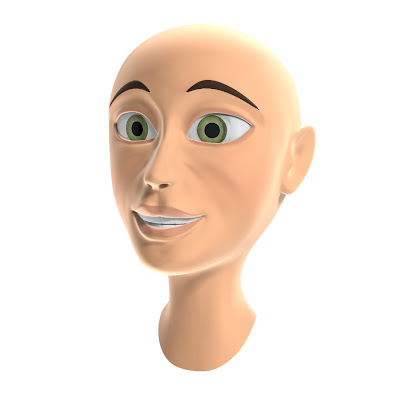
To complete the forthcoming rig, you’ll need at least two different expressions. In this example we’ll use a happy and an angry expression but please feel free to use whichever you like. Joy or happiness is a rather vague term and essentially represents just about any positive feeling. Naturally, all of these feelings aren’t expressed by the same expression at different intensity. If you’re in a good mood you’ll probably just have a mild smile on your face but when you burst into laughter you have an entire different face.
Step 04
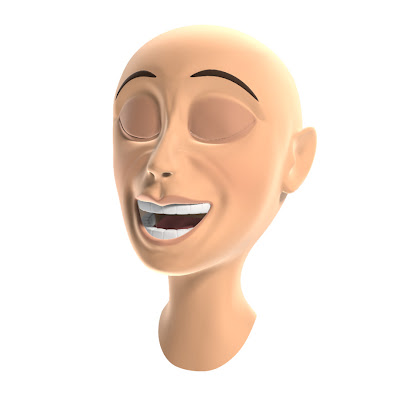
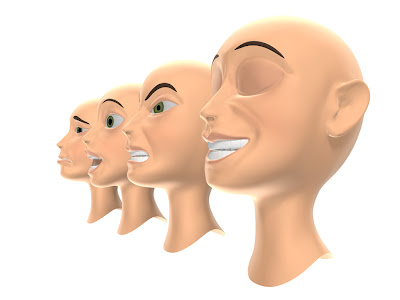
When you’re happy the corner of the mouth are raised, creating a smile. The pupils will dilate, the corners of your eyes contracts which create small wrinkles, and the eyebrows will be raised. To exaggerate the effect, you can raise the inner part of the eyebrows slightly more, which opens the face even further. You’re going for the full laughter, so the jaw may drop slightly, teeth and gums will be exposed and the eyelids will close.
 Step 05
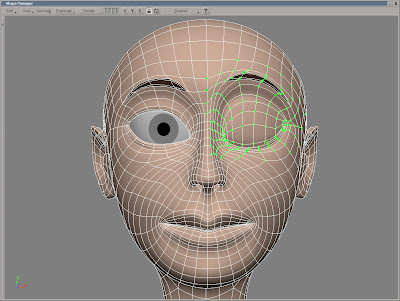
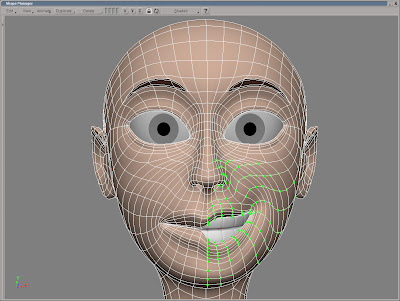
Select the shape called Shape in the shape list and click the Duplicate button to create a new shape. Name it Eye_Happy_Left. To make sure the different shapes won’t intersect the eyes or teeth, you obviously need to see them as well. From the View menu choose Display All Objects. Select the points representing the left eyelid and move these downwards to close the eye. Push the area underneath the eye slightly upwards and raise the eyebrow. Use the above screenshot for reference.
 Step 06
Duplicate the default shape again and name it Mouth_Happy_Left. Move the points as seen in the screenshot (a high resolution can be found on this issues CD). A smile will not come of as genuine or realistic without the furrows. Think of a smooth line running from the outside the nostril to the corner of the mouth. Select these points and move them inwards to create the crease. Remember to only modify the left part of the face, as you’ll be mirroring these to form the right side in a few steps.
 Step 07
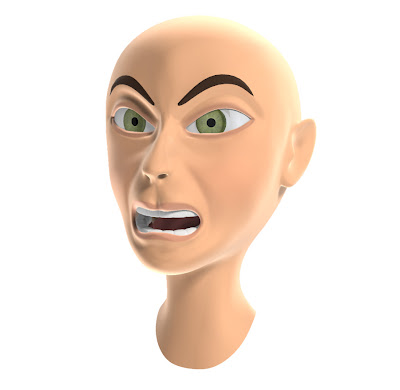
Just as with the happiness, we’re going for true anger rather than just being a bit irritated. The eyebrows will contact and drop down to the eyes. Creases may appear between the eyebrows but the forehead will not furrow. The eyelids and look will become tense. The lower eyelid will raise and the pupils will contract into small holes. The mouth will open up on both sides and the teeth will be exposed. The jaw may also be dropped for the character to really shout his anger.
 Step 08
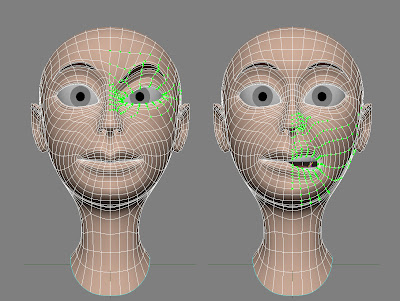
Duplicate the default shape and name it Eye_Angry_left. Lower the eyebrow and move the inner part towards the nose so it almost resembles a stretched s-shape. Raise lower eyelid. Use the left part of the above screenshot as reference to create the shape for the eye. Duplicate the default shape again and name it Mouth_Angry_Left. Modify the upper lip to form an m-shape and the lower lip to form an m-shape turned upside-down, as seen in the right part of the screenshot.
 Step 09
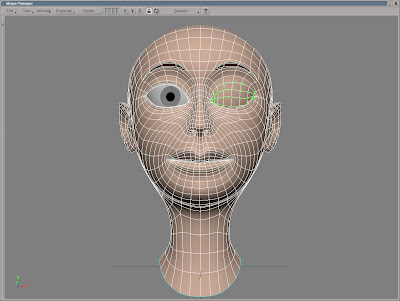
You blink once every 2-10 seconds. This is usually done without your conscious control or you ever having to worry about it. Unless you are a CG character of course. Your character will open and close the eyes at a different pace depending on his personality but more importantly because of his emotions. In a normal blink the eyelids will close slowly and open rapidly. If the lids open slowly as well the character will come of as tired or stupid or even both. Create a new shape with the eye fully closed and name it Eye_Closed_Left.
STAGE TWO Mirroring the shapes
 Step 10
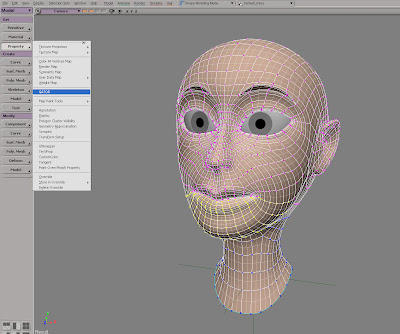
With the shapes for the left side of the face in place, you’ll need to copy them to the right side of the face as well. Select the head object and press [Ctrl] + [D] to create a duplicate. Select the original head again and from the Get > Property menu choose GATOR. Pick the new copy when prompted and then right click to end the picking session.
 Step 11
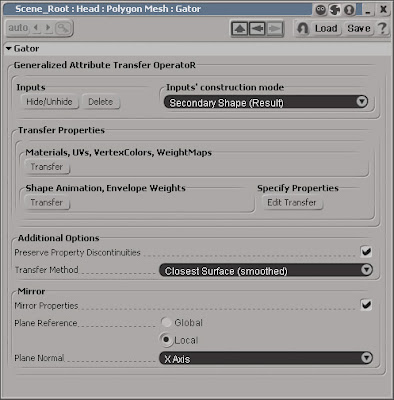
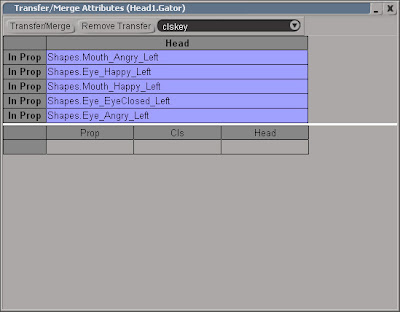
Before you transfer the shapes you’ll need to tell GATOR to mirror them, otherwise you would end up with two identical shapes. At the bottom of the GATOR PPG, check the Mirror Properties checkbox then click the Edit Transfer button in Specify Properties section. This opens a new PPG where you can choose witch properties to transfer. In the drop down menu, choose clskey.
 Step 12
Select all the shapes in the list and then press the Transfer/Merge button. Close the PPGs. GATOR is a live operator, meaning that if you make changes to the input object (the copy of the head) these will get transferred as well. Select the original Head and press the Freeze M button in the MCP to freeze the modelling stack. Delete the Head duplicate.
 Step 13
Open the Shape manager again. Rename all the new shapes to Right (instead of Left) and switch to the Anime Tab (this will automatically add all the shape tracks to the mixer). If the new shapes don’t appear in the shape list, close the Shape Manager, open an explorer and expand the Head > Polygon Mesh node. Select the Cluster shape Combiner and press [Delete] to delete it. Reopen the shape Manager
 Step 14
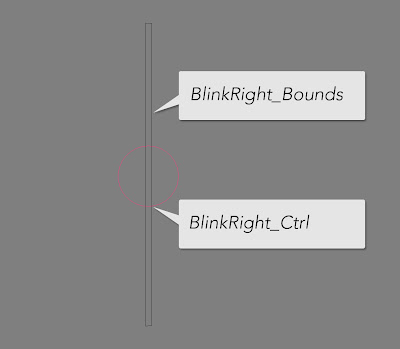
For this face rig you’ll need two types of controls. The first is a standard slider which allows you to go from 0 to 1 on a single axis. The second will be allowed to move freely on two axis simultaneously within the boundary of a square. From the Get > Primitive > Implicit menu choose Square. Set the Length to 1 and name it BlinkRight_Bounds. Scale it to 0.02 on the X-axis to make it thin. Get an implicit Circle, set the radius to 0.1 and name it BlinkRight_Ctrl.
 Step 15
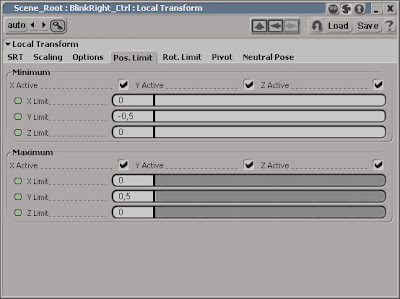
With the circle still selected, click the Parent button in the MCP and then select the square with the middle mouse button to make it parent of the circle. Right click to end the picking session. Select the circle again and press [Ctrl] + [K] to open its local transform PPG. Switch to the Pos.Limit tab and activate Minimum and Maximum for all three axis. Set the Y Minimum Limit to -0.5 and the Maximum Limit to 0.5. Set both the X and Z Maximum and Minimum to 0 (zero) to lock in place.
 Step 16
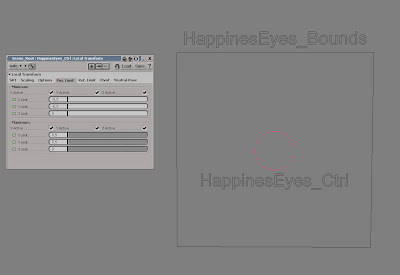
Repeat the procedure (or just copy the hierarchy) to create two more sliders. One called BlinkLeft_ and the other OpenMouth_. Create a new Implicit Square. Set the size to 1 and name it HappinesEyes_Bounds. Get another circle with the seize 0.1, parent it under the cube and name it HappinessEyes_Ctrl. Set the X and Y Minimum Limits to -0.5 and the Maximum to.5 (as seen in step 15). Set the Z-axis Min/Max to 0. This will restrain the circle from going outside the square. Duplicate the control and rename it to HappinesMouth_.
 Step 17
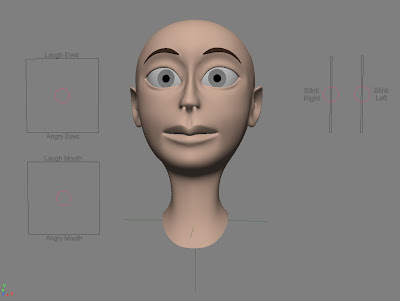
Position the controls in logical arrangement next to the head. Select all the bounds squares and parent them underneath the HeadBone. With the squares still selected click the Selection button in the MCP and in the explorer click the Visibility. In the PPG, uncheck the Selectability. Press [Ctrl]+ [4] to switch to the Palette Toolbar. Click on the pink color swatches (seeing that our hero character is a true fashionista, the pink will suite her nicely) and then select all _Ctrl objects. Right click to end the picking session.
 Step 18
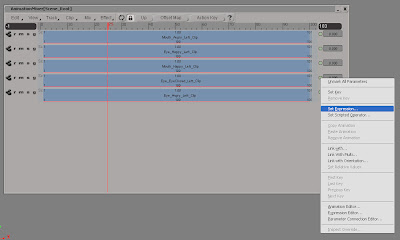
Select the Head and press [Alt] + [0] to open the Animation Mixer. Double click on the Shapes_ClusterClips clip to open the compound. (the clips for the right part of the face is found in the other compound) The first, and most straightforward, control you’ll connect is the blinking. Scroll down to the clip Eye_Closed_Left and right click on the animation divot (green dot) next to its track. Choose Set Expression from the menu. The idea is to link the intensity of the eye blink shape to the Y position of the blink left slider.
 Step 19
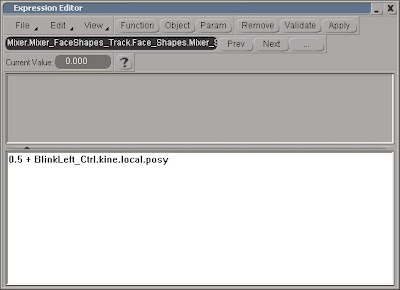
The BlinkLeft_Ctrl slider currently goes from -0.5 to 0.5 so you’ll need to add 0.5 to the expression. In the Editing Pane in the Expression Editor, enter 0.5+BlinkLeft_Ctrl.kine.local.posy. Press the Validate button to make sure it’s valid. Then click the Apply button and close the editor. Repeat the same procedure for the Eye_Closed_Right clip but connect it to the BlinkRight_Ctrl.kine.local.posy. That was fun. Now let’s address the slightly more sophisticated controls.
 Step 20
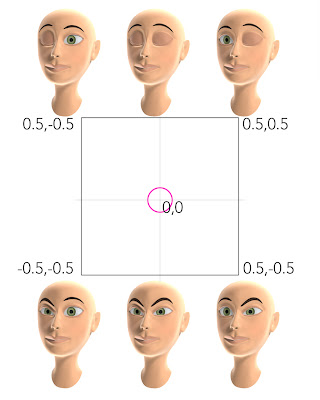
Locate the Eye_Happy_Left clip, click the animation divot and choose Set Expression. The first part of the expression is rather simple. If you move the HappinesEyes_Ctrl upwards the intensity of the happy right eye should increase as well. However, this is only true if the HappinesEyes_Ctrl is between 0 and 0.5 on its local Y-axis (this will be remapped to 0 to 1 for the intensity). If the Eyes_Ctrl is below zero, it shouldn’t have any effect on the clip.
 Step 21
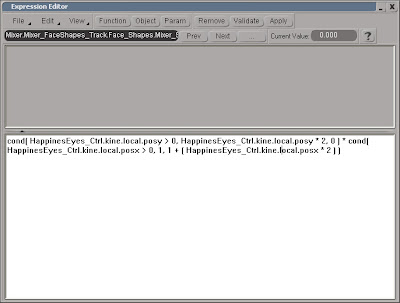
To complicate things even further, it should only have full effect when it’s position in the upper right part of the square (0 to 0.5 on the X-axis). If it’s moved to the left of the centre the intensity should decrease equally with the distance travelled. So if it’s positioned in the top left corner the intensity should be zero. In the editing pane enter cond( HappinesEyes_Ctrl.kine.local.posy > 0, HappinesEyes_Ctrl.kine.local.posy * 2, 0 )
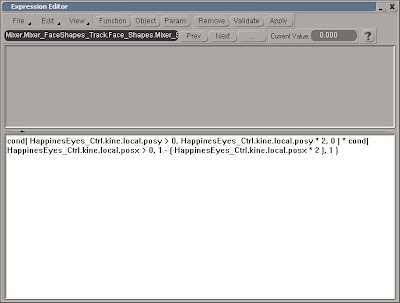 Step 22
The first part of the expression states if the Y position of the Eyes_Ctrl is greater than 0, then the value will be set to the position of the Eyes_Ctrl *2 (to remap it to 0-1). If the position on the other hand is less than 0, then the value will be set to 0. To add the X position to equation you’ll need another condition. Add * cond( HappinesEyes_Ctrl.kine.local.posx > 0, 1, ( HappinesEyes_Ctrl.kine.local.posx * 2 )+1) to the expression.
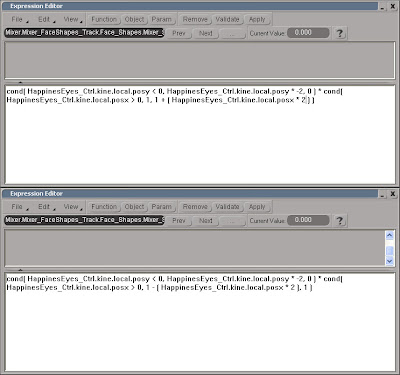 Step 23
The second condition states that if the Eyes_Ctrl position is greater than 0 the first condition will be multiplied by 1 (no effect). If the position is less than 0 the first condition will be multiplied by a value between -1 and 0 (which reduces the intensity). Add the expression cond( HappinesEyes_Ctrl.kine.local.posy > 0, HappinesEyes_Ctrl.kine.local.posy * 2, 0 ) * cond( HappinesEyes_Ctrl.kine.local.posx > 0, 1 - ( HappinesEyes_Ctrl.kine.local.posx * 2 ), 1 )
to the Eye_Happy_RIght clip.
Step 24
The next step is to create the same action for the angry eyes shape, which will be added when the Eyes_Ctrl is below zero. Locate the Eye_Angry_Right clip and add en expression. In the editing pane enter
cond( HappinesEyes_Ctrl.kine.local.posy <> 0, 1 - ( HappinesEyes_Ctrl.kine.local.posx * 2 ), 1 )
The last bit to complete the control is to add the expression for the angry left clip.
cond( HappinesEyes_Ctrl.kine.local.posy <> 0, 1, 1 + ( HappinesEyes_Ctrl.kine.local.posx * 2 ) )
Repeat step 21-24 to create the mouth control. The only difference is that you’ll use the Mouth_Angry_Left/Right clips and you will link them to the HappinesMouth_Ctrl. The scene Face_Finished.scn also includes two additional emotions and controls for the eyes, the pupil dilation and opening and closing of the mouth.


9 comments:
we want more....
Your blog is great, I check it everyday to see if you added anything.
Keep up the great work, it certainly is appreciated!
Awesome. I don't do much character stuff, but whenever I need to I'll make sure to check back to this article/tutorial, to do this kind of setup.
im new to your blog. very cool blog. perfect tutorials and exactly what i was looking for. love more XSI with this blog.
When I got to the cond( HappinessEyes_Ctrl.kine.local.posy <> 0 , 1- ( HappinessEye_Ctrl.kine.local.posx * 2 ) , 1 )
It gives me an error. I named the CTRL with HapinessEye_Ctrl (double s) and it´s not running.
Unknown element: HappinessEye_Ctrl.kine.local.posx
Error found at this point: * 1 ) , 1 )
You have eye_ctrl and eyes_ctrl in your code
Thanks for keeping this resource available.
Why you don't use "links with set relative values" instead expressions?
The ”Link with…” is essentially an expression where you link the value (or attribute) to another using a f-curve. You wouldn’t gain anything by doing so in this situation on the contrary, writing the full expressions is easier, clearer and a more foolproof. In addition, if you’re applying the same expression to multiple objects it’s easy to substitute the objects by just using search and replace function in any text editor.
Post a Comment