 On planet earth matter can traditionally exist in three physical states or forms; solid, liquid and gas. There are in fact a couple of more states such as plasma and liquid crystal, but let’s not get too technical. Condensation is essentially water changing it physical state of aggregation from gaseous into liquid (guess you’re glad we didn’t get in to the technical parts). One of the most common examples of this is the creation of clouds. As warm air rises to the atmosphere it cools and loses its ability to hold water vapor. The water molecules will then clump together to form cloud droplets, which then of course fall as rain (a phenomenon anyone who has visit England is far too familiar with).
This is the exact same thing that happens on a cold glass bottle on a warm summer day. Rather than forming small clouds around bottle the water vapor will form tiny droplets on any part of the surface that is colder than its surrounding air. Once the water droplets on the bottle reach a certain size or mass, gravity will grab hold of them forcing them towards the ground. As the water drop slides down the surface of the bottle it will attract any neighboring drops along its path, which creates a small water trail. The amount of water vapor the air can hold and the rate it condensate is determined by a number of factors. The characteristics of the water drops is then additionally affected by the material of the object and it’s surface.
Recreating the complete atmospheric process in real-time would pretty much be like watching paint dry (or the opposite). For your convenience we’ve speedup the course of action on the following pages, where you’ll create a complete and fully functional condensation compound using Softimage’s new interactive creative environment – ICE.
Note that covering a glass bottle with thousands of tiny water drops will obviously cost you once you hit the render button. The two most important attributes for creating a realistic glass or water material is their transparency and their reflectivity. As your entire scene is filled by nothing but the two, you will be required to crank up the reflection and refraction rays depth in the render options optimization tab. even tough the creation of these materials unfortunately falls outside the scope of this walkthrough; it shouldn’t be too difficult for you to create them on your own as ICE particles allows you to use any of the standard materials such as Blinn or Phong.
The project files used in this tutorial can be found at:
http://www.redi-vivus.com/Caffeineabuse/ICE_Water_Condensation.zip
STAGE ONE Preparing the bottle Step 01
Start by open the scene Bottle.scn from this issue DVD. Staying true to reality means that any part of the bottle that is colder than the air surrounding it will be exposed to the tiny water drops. This would include the bottom and inside of the bottle as well. As these parts won’t be visible in your CG reproduction there’s no point wasting precious CPU resources to compute them, so you’re going to limit the effect to the outer surface of the bottle.
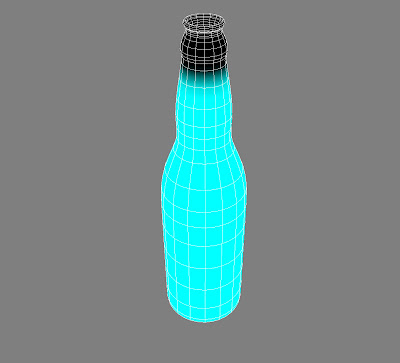 Step 02
To do so you’ll need to create a Weight Map to mask which area to emit particle and which will not. Select the Bottle and from the Get > Property menu choose Weight Map. Press [W] to activate the Pain Tool and with the left mouse button paint the outside of the bottle. Note that you can change the size of the brush by hold down the middle mouse button and drag to left or right and the right mouse button to erase painted area. When done, press [SPACE] to exit the paint mode.
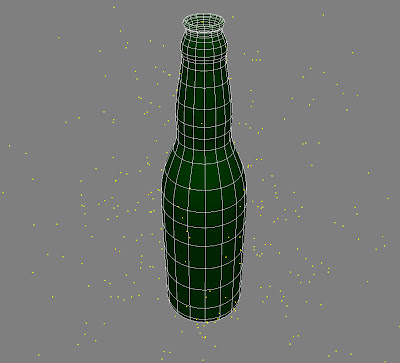 Step 03
With the Weight Map in place it’s time to emit some particles. Press [4] to switch to the Simulate toolbar. With the Bottle selected, click ICE > Create > Emit Particle from Selection. This creates the PointCloud where all the magic will take place. If you play your animation you’ll se that particles are emitted from the entire bottle and fly off in to space. This obviously has to change, so press [Alt]+[9] to open an ICE Tree.
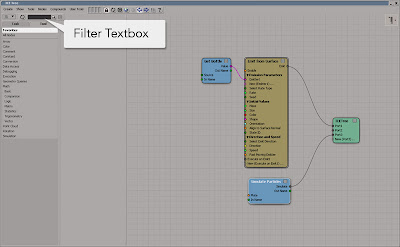 Step 04
There are two tabs in the Preset Manager, Task and Tools. Under the Tools tab you’ll find all the low-level nodes of ICE and under Task you’ll find low-level nodes packaged together to perform specific tasks. A far quicker way to find the node you’re looking for than browsing trough the manager is by using the Filter text box. By entering the first character (or any character for that matter) in the text box it will automatically displays all the nodes that match your filter criteria.
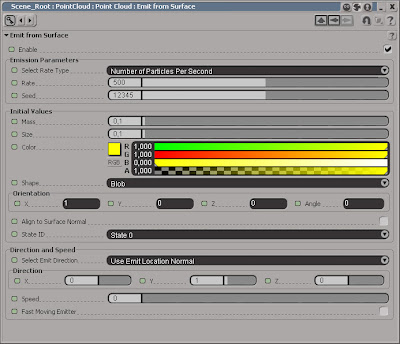 Step 05
Double click on the Emit From Surface node to open its PPG. While it shouldn’t take more than a couple of minutes to get condensation on the bottle in real life, it just seems a little overambitious to reproduce the effect in real-time. So to speed up the process you’ll emit a good amount of particles (which in you case equals water drops,) for a few seconds and then leave it at that. Change the Rate to 500. You will alter the size of the particles later on so just leave it for now. Change the Shape to Blob and set the Speed to 0. Close the PPG
 Step 06
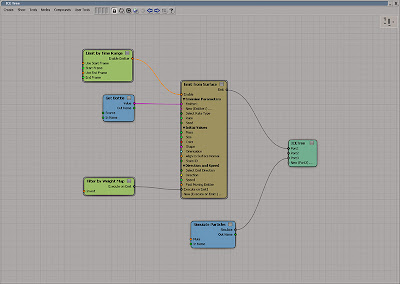
Get a Limit by Time Range node (by entering part of its name in the Filter textbox as described earlier). Open its PPG and set the Start Frame to 0 and the End Frame to 100. Close the PPG and connect the node to the Enable input of the Emit from Surface node. Get a Filter by Weight Map node and connect it to the Execute on Emit 1 input of Emit from Surface node. Now your particles will only be emitted from frame 0 to frame 100 and only from the area you’ve painted with the Weight Map.
 Step 07
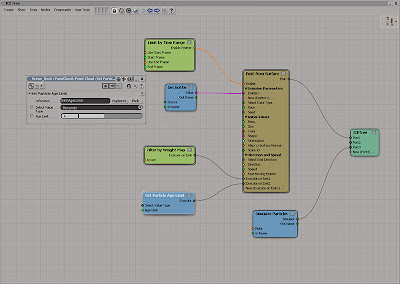
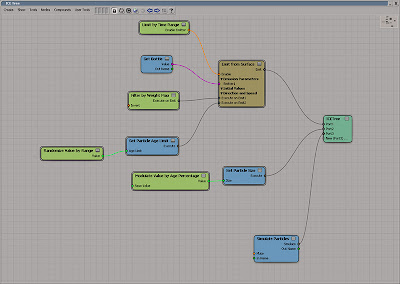
To add variety and dynamic to the water drops you are going to change their size based on how many percentage they’ve lived of their total life. By default the particles don’t have age awareness so this has to be added manually. Get a Set Particle Age Limit node and connect it to the New (Execute on Emit 1)… input of the Emit from Surface node. This will set the life of each particle in seconds.
 Step 08
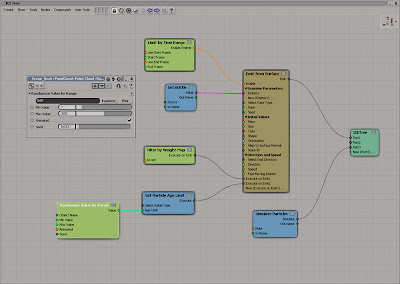
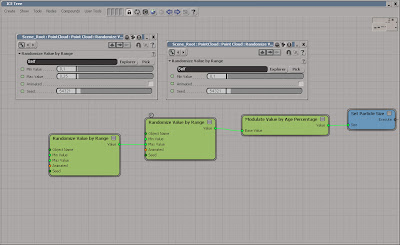
Your particles now have an age limit but they will all live for the exact same duration. Even though this alone should brake up much of the uniformity of the particles, it still lacks an organic touch. Get a Randomzie Value by Range node and plug it into the Age Limit input of the Set Particle Age Limit node. In the Randomize Value by Range PPG, change the Minimum Value to 1 and the Maximum to 200.
 Step 09
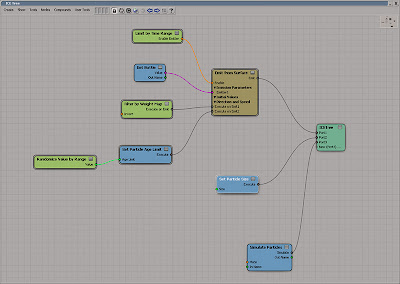
Let’s set the size of the particles. Get a Set Particle Size node and connect it to the Port2 of the ICE Tree node. The ICE tree is processed from left to the right and the terminator (the ICE Tree node) from top to bottom. The terminal node (the ICE Tree node) is then executed from top to bottom. So the Emit from Surface branch plugged in to Port1 will be executed before the Set Particle Size you’ve just plugged in to Port2 which is executed before Port3 and so on.
 Step 10
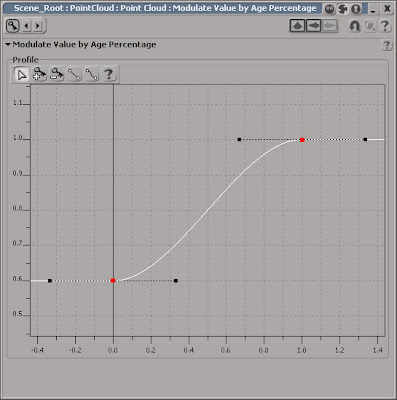
The Set Particle Size node won’t do much good alone since there is no data feed in to it. Get a Modulate Value by Age Percentage node and connect it to the Size input of the Set Particle Size node. Open the Modulate Value by Age Percentage PPG. The profile will determine how the particles size will change over time based on the Base Value. Were the left keyframe represents when the particle is born and the right keyframe when it reaches the end of its life.
 Step 11
So if the left keyframe is set to 0.6 it means the particles will size will be 60% of the Base Value when it’s born. Select the left keyframe in the graph, right click and choose Key Properties from the menu. Set the value to 0.6. Click on the Next Key button. Set this Value to 1 and close the PPG. Using a single value as the Base Value means that all particles will have the same size at the beginning and end of their lives, even if their age limit will be completely different.
 Step 13
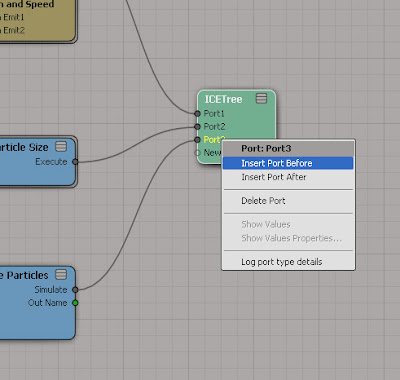
All the Ports of the ICE Tree node are currently occupied so you’ll need to add new Port. On the ICE Tree node, right-click on the Port3 input (currently occupied by the Simulate Particles node) and choose Insert Port Before from the menu. Add four more ports while you are at it, so you have five free ports in total. Get a Slide on Surface node and connect it to the Port3 of the ICE Tree node.
 Step 14
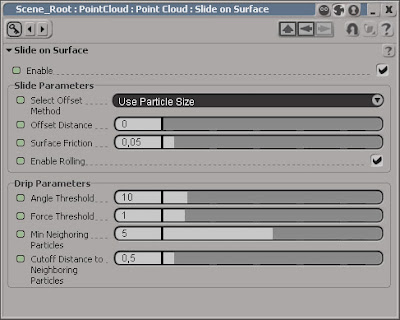
If you open the Slide on Surface compound PPG you’ll see a number of parameters to control at which angle the particles are allowed to drip of the surface, how many particles that needs to be together, how much force will be required etc. Since you’re basically just want to stick the water drops to the surface you don’t need to pay too much attention to these. Decrease the Angle Threshold to 10 or so and the Min Neighbouring Particles to 5. Close the PPG.
 Step 15
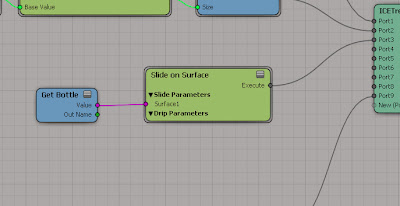
The particles don’t know which surface they are supposed to slide on, so you need provide this data as well. Press [8] to open an Explorer and drag and drop the Bottle object from the Explorer in to the ICE Tree workspace. Connect the Output value of the Get Bottle node to the Surface 1 Input of the Slide on Surface node.
 Step 16
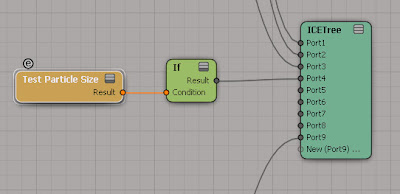
If you simply add a gravity force to the ICE Tree, all the particles would be affected and run down the bottle straight away. While you do want a gravity force, you only want the particles that are above a certain size to be affected. Get an If node and a Test Particle Size node. Connect the Result output of the If node to the Port4 input of the ICE Tree node. Connect the Result output of the Test Particle Size to the Condition input of the If node.
 Step 17
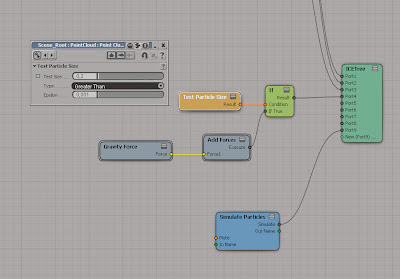
Open the Test Particle Size PPG and set the Test Size parameter to 0.2. If the particle size greater than 0.2 the Condition is true, and the If True port will be executed. If the size is less that 0.2 the If False is executed which in your scenario means that nothing will happen. Get an Add Forces node and connect it to the If True input of the If node. Get a Gravity Force and connect it to the Force1 input of the Add Forces node.
 Step 18
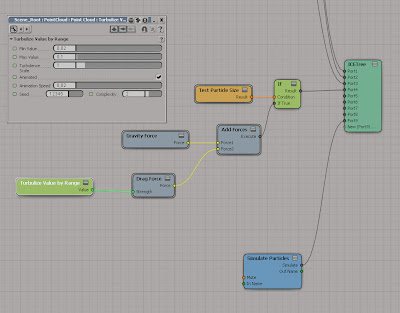
Get a Drag Force and connect it to the New (Force1)… input of the Add Forces node. This will create a flow resistance to the particle and balance the force of the gravity. To further enhance the variation of the particles motion you’ll turbulize the strength of the Drag Force. Get a Turbulize Value by Range and plug it into the Strength input of the Drag Force. Open its PPG and set the Min Value to 0.02 and the Max Value to 0.1. Close the PPG.
STAGE SIX Creating a water trail
 Step 19
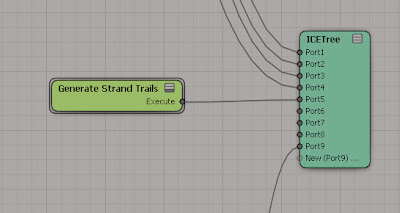
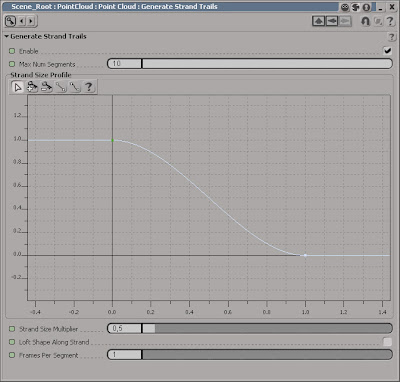
As the water drops run along the surface of the bottle they will leave a fine trail of water. Get a Generate Strand Trails node and plug it into Port5 of the ICETree node. Open the Generate Strand Trails PPG. Set the Max num Segments to 10. This parameter controls the length of the trail, the higher the value the longer the water trail.
 Step 20
The Strand Size Profile determines the size of the trail, which in this scenario means overall shape. Select the right keyframe, right-click on it and choose Key Properties from the Menu. Set the Value to 0. This will fadeout the water at the end of the trail, giving it a more realistic shape. Set the Strand Size Multiplier to 0.5 to tone down the overall trail.
 Step 21
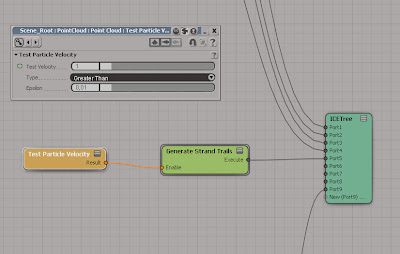
Just as with the gravity, you don’t want to create trails on all the particles in the simulation but limit the effect to the drops that are actually moving down along the bottle. Rather than testing the particle size you’ll test the particles velocity. The particle will only leave a trail if its velocity exceeds a certain number. Get a Test Particle Velocity and connect it to the Enable input of the Generate Strand Trails node. Open the Test Particle Velocity PPG and set the Test Velocity to 1.
 Step 22
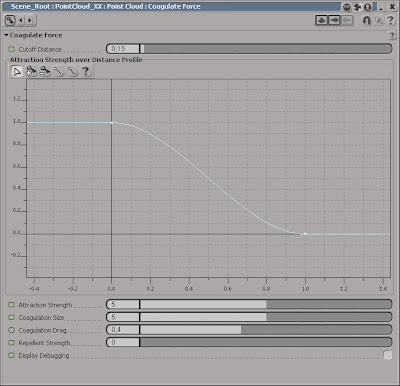
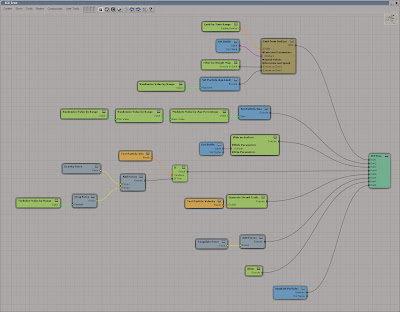
So you have gravity, drag, water trails and the actual surface of the bottle all taken into account, but the particles still don’t have any affect on each other. The coagulate force enables you to attract particles together, creating small lumps of particles (which of course creates a slightly larger water drop) based on their distance to each other. The force can have a drastic effect on all your particles so the trick is to use small subtle values.
 Step 23
Get an Add forces node and connect it to the Port6 input of the ICETree node. Get a Coagulate Force node and connect it to the Force1 input of the Add Force node. Open the Coagulate Force PPG. The Cutoff Distance determines the maximum distance allowed between two particles for the force to have an effect. Set the Cutoff Distance to 0.15. Increase the Coagulation Drag to 0.4 to slow down the particles as they get closer and set the Repellent Strength to 0.
 Step 24
The very last node to add in this walkthrough is to control the amount of blending between the water drops. Get a Blobs node and connect it to thePort7 input of the ICETree node and you’re ICETree is completed. Before you apply the water and glass material to your scene elements it’s wise to do test rendering and fine-tuning of the particles using a standard Blinn shader. The number, size and characteristics of the water drops all relate to the temperature and humidity of the air as well as the surface of the bottle but perhaps more importantly, your personal taste. All the above values should be used merely as a guide in your quest for the perfect condensation.



11 comments:
hi there, great article!
i have a slight problem here... (maybe just me and my old 7.01) anyway, if i replace your emitter with the ioxu dart throwing compound
http://blog.ioxu.com/?p=301
i'll get very nice results but can't render... ?!
ok, not your problem but maybe of interest for you...
any ideas?
cheers,
robert
hi again,
the coagulate force seems to freeze my render when i up the emission-rate. even without the dart-throwing-compound it's not working for me. dunno if it got fixed in the latest softimage.
so, my problem is solved for now...
(just use coagulate for hero-drops only and skip the others... ;-) )
robert
Hi Robert,
I haven’t used ioxu dart throwing compound so I can’t really comment on what may have gone wrong. Are you still experience problems with the water drops… ?
Cheers
O
ola,
figured that the coagulate force isn't working properly. ioxu's compound hasn't anyything to do with it. i experience something like a "memoryleak" with too many drops (ex. change your emission rate to 5000) processed by coagulate-force in the camera view. whenever i render this - my RAM gets eaten-up and mr will die! ;-) my solution: keep an eye on the dropcount and for closeups, just emit where the closeup is looking... bad for animation , though. cheers!
robert
Hi and thank you for this tutorial!
Much appreciated!
Glad you like it...
Superb article !!!
Thank you so much. This is very cool not only in it simple cleverness but also in how concise and articulate you explain why you are doing in each step and the purpose of each action. Quality explanation and practicality. Kudos.
R
Hi!
Thanks for the great tutorial. I'm quite a newbie when it comes to this stuff but I thought I'd ask anyway.
I followed this tutorial and everything works out fine, I then tried to recreate this scene by using a bottle I modeled in Rhino 3D. First I tried to bring in the model as a polygon mesh. This worked fine except the slide on surface bit didn't seem to work. I'm guessing this is because polygons don't have real curvature infomation?
I then tried the same thing except this time I bought the model in using IGES, it works except the computation is unbelievably slow... I'm pretty green in XSI so I'm not sure if it's perhaps the settings of how XSI interpolates nurbs curves or something... Any ideas what it could be?
oh don't worry I think there must have been some sort of problem with my scene. I retried it with your finished scene and it worked 100% with a polygon mesh
Hi
I've been following along with your tutorial and it's all worked great except the bottle I'm using has an undercut(ie it bulges at the top and then gets smaller further down) The problem is that while some of the particles seem to flow along the surface of the bottle and then continue along the undercut some of the other particles fall off at the bulge of the bottle, It doesn't look very realistic because they "fall" so slowly.
I tried to overcome this by changing the angle threshold, I tried various different angles like 10, 0, -30 and -60 but it didn't seem to have an effect. I also tried to increase the force threshold to up to 100 but makes no discernible difference.
http://imgur.com/6RfAw.jpg
http://imgur.com/7qM4l
Thanks!
Post a Comment