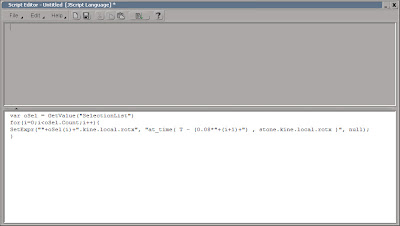
To change the offset of the stones, simply change the 0.08 value in the script editor and run the script again.

If you don’t have a deck of dominoes of your own, start by opening the dominoes.scn scene from this issues CD. Select the stone object, from the Main Command Panel > Constrain menu chose Curve (Path) and chose the dominoes_path curve when prompted. In the Path Constraint PPG, switch to the Tangency tab. Check the Active checkbox and click the –Z button to align the stone. Leave the PPG open, because you’ll return to it in just a few seconds. With the stone still selected, press [Shift]+[Ctrl]+[D] to open the Duplicate Multiple PPG. Enter 30 as the number of Copies and press OK. Press [8] to open an Explorer. Select the stone object, hold down [Shift] and select the stone30. This is important as the order in which the objects get selected will determine in what order they’ll get distributed. Return to the Path Constraint PPG and enter L(100) in the Path %age. This will distribute all the selected stones evenly along the curve. Once that is done you no longer need the path constraint, so with all the stones still selected chose Constrain > Remove All Constraints.
While you’re more than welcome to animate each stone falling onto the next and so on by hand, once you reach your second or third stone you’ll probably realize it just isn’t a viable solution. A more convenient approach is to animate a single stone and then pass on its animation to the others, each with the time slightly offset. Select the stone and set a keyframe for the rotation. Go to frame 4, rotate the stone -37 degrees on the X-axis (so the stone just touches the next stone) and set a new keyframe. Go to frame 15, rotate the stone to -82 degrees and set another keyframe. Next, press [0] (zero) to open an Animation Editor and change the slope handles on the fcurve to match the screenshot. Open an Explorer and select stone1 to stone30 and open the Script Editor. Enter the following lines and press the Run button. This will loop trough your selection and creates an expression which referencing the animation on the x-axis and applies an additional offset of 0.08 seconds for each stone.
While you’re more than welcome to animate each stone falling onto the next and so on by hand, once you reach your second or third stone you’ll probably realize it just isn’t a viable solution. A more convenient approach is to animate a single stone and then pass on its animation to the others, each with the time slightly offset. Select the stone and set a keyframe for the rotation. Go to frame 4, rotate the stone -37 degrees on the X-axis (so the stone just touches the next stone) and set a new keyframe. Go to frame 15, rotate the stone to -82 degrees and set another keyframe. Next, press [0] (zero) to open an Animation Editor and change the slope handles on the fcurve to match the screenshot. Open an Explorer and select stone1 to stone30 and open the Script Editor. Enter the following lines and press the Run button. This will loop trough your selection and creates an expression which referencing the animation on the x-axis and applies an additional offset of 0.08 seconds for each stone.
The project files used in this tutorial can be found at:
http://www.Redi-Vivus.com/Caffeineabuse/Offset_in_Time.zip
http://www.Redi-Vivus.com/Caffeineabuse/Offset_in_Time.zip

Any changes made to the first stone’s animation will automatically change the animation of all the others, as their controlled trough an expression.
Quick tip
This approach is by no means limited to dominoes stones. The same expression can be used in numerous situations where you want to use the same animation on many objects, but offset them in time.
This approach is by no means limited to dominoes stones. The same expression can be used in numerous situations where you want to use the same animation on many objects, but offset them in time.


0 comments:
Post a Comment